16 in Montreal, Quebec
ALE Chart of Accounts to other environments
ALE Chart of Accounts to other environments
- 2019-01-08
- Posted by: Adrian
- Category: ALE, BD18, Chart of Accounts, GLCORE, GLMAST, IDOC Chart of Accounts, SKA1, SKB1
One of the big challenges during an SAP FICO implemention is the creation of numerous GL accounts all along the project. Depending on the type of client, project we could start by an standard SAP chart of accounts a build on top of it; but no matter what, we will always have to create new GL accounts. In some projects I ended up creating up to 150 new GL accounts out of a Chart of account of 700 GL accounts, which gives us more than 20% of new accounts to create.
In those cases, you would end up creating some sort of migration program like an LSMW, or something else. But unfortunately, sometimes those accounts do not come all at once from your client as they are still deciding and have not come with a final list all at once.
So every time a new series of accounts needs to be created, you need to create them in several environments (DEV, QA, Training and PROD). Except for Prod, all the rest will most likely have several clients each where you will also have to create the accounts. At the end you have at least a minimum of 8 if not more environments / clients to maintain if you want to have everything in sync, which could be quite a challenge and effort. This is highly recommended because if do not do it, then you will have inconsistencies and discrepancies all over the place. And in most of the cases you need to create them in your Golden DEV Config client as normally you need to update config for Document Splitting, Automatic Account determination or other config points as well.
So, How do you keep in sync all the environments without a lot of effort ? There are different ways of doing it that I will list here from more to less effort
#1 – Create all the accounts manually in each environment / client.
#2 – Create an LSMW and run it on every single environment / client.
#3 – Transport the entire Chart of Accounts (including the Co.Code portion of it, as I already mentioned in another post)
#4 – ALE the Chart of Accounts from your Config Golden DEV Client to any other clients and environments (including Prod).
How do you ALE your Chart of Accounts across your SAP Landscape ?
#1 You will need to create what is called a “Distribution Model” that will allow you to do the setup for your ALE (Application Link Enabling (ALE) is a mechanism for the exchange of business data between loosely-coupled R/3 applications built by customers of SAP).
Tcode: SALE (in your Golden DEV Config client, DEV-200)

Create your Distribution Model
First you will create the Model (Like ALEDISTRIB in the image), then you will create a sub level which will be your source client (Ex S4DCLNT200). Always the 3 letters for the instance name, then the CLNT for client and last the Client #.
After that you will create another level underneath S4DCLNT200 for your Target Client. In my case S4DCLNT211.

Then you will click in “Add Message Type” and this is where you will add your IDOC / Message Type that we will be used to ALE our Chart of accounts.
We will add two different ones.
GLCORE: Chart of Accounts section / level
GLMAST : Chart of Account and Company Code level (recommended)
As you can see I have other set of Message Types in this Distribution Model which are used for other Master Data objects (like Profit Center, Cost Centers, etc.), which eventually will be covered by other Posts.
Now that you have created the Distribution Model and added your Message Types, you will need to create your Partner Profiles so then when the IDOCs are generated, the system will know what to do and where to send them. There is an automatic option that will do that for you.

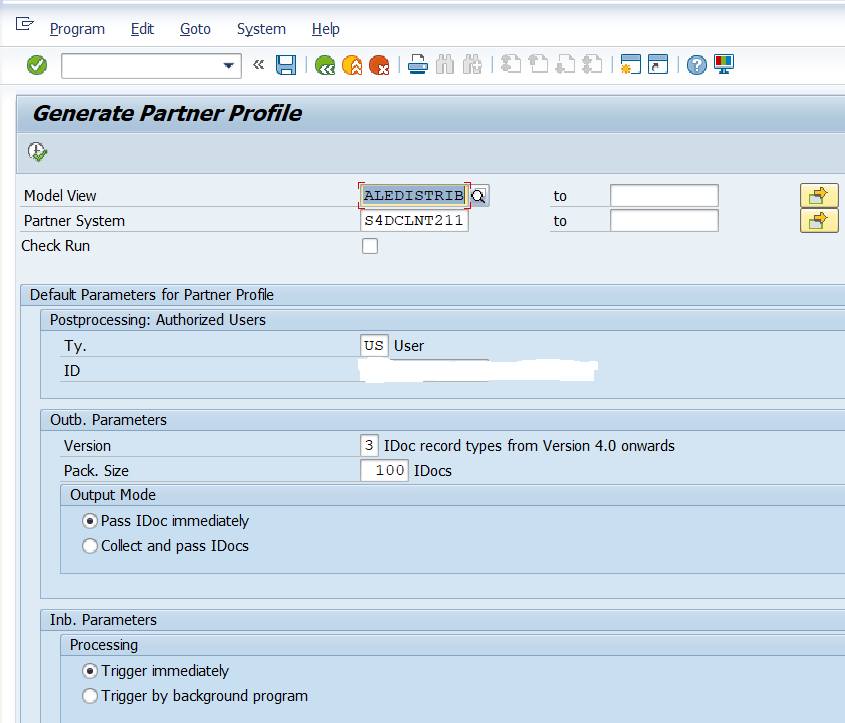

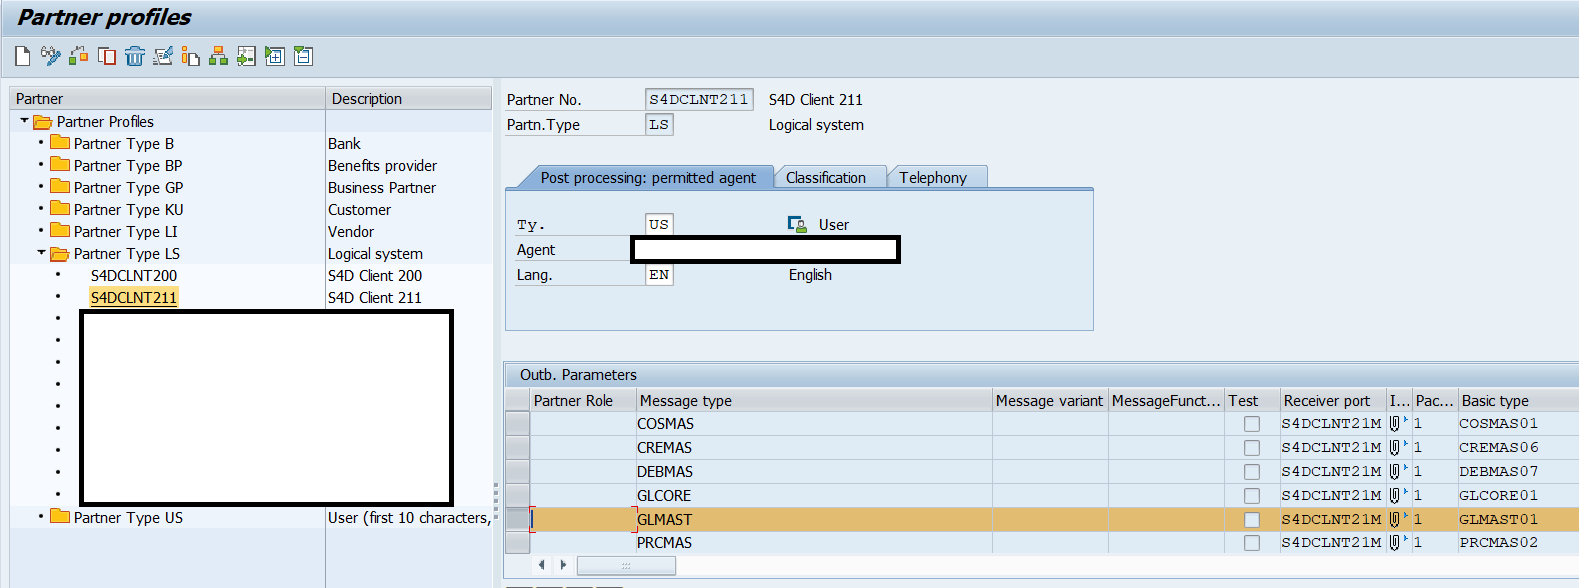
After running this process your Outbound Partner profiles will be created in WE20 (see below the result).
** At this point you might receive some errors due to missing RFC connections from 200 to any other client. Raise a request to your Basis resource to create all of these missing RFCs and re-do the Generate Partner Profile step.


At this point your setup in your DEV Config Golden client has been completed. If you want to expand your Distribution Model so you can ALE your Chart of Accounts to other Target Clients or Environments, you need to create another sub-level hanging from S4DCLNT200 and create another one Ex. S4QCLNT400 for a QA 400 Client. And Create the Outbound Partner profiles as well
Create Inbound Partner Profile in your Target Client/s
Now for every Target client that you have defined in your Distribution Model, you need to go in individually and create your Inbound Partner profiles so the Target system can receive and process the IDOCs.
Tcode: WE20 (Ex in DEV-211 as my Target Client)

Once you create it, you will SAVE it.
After this you have finished your ALE Setup that will allow you to Distribute your Chart of Accounts Master Data from 200 into 211 client.
Send Chart of Accounts from 200 to 211 using ALE
Tcode: BD18

This Tcode is the one that will trigger the IDOC creation based on the selection criteria that we will enter. (Ex. Chart of Accounts, Company Code, GL #s).
Then you will specify your Logical Message GLMAST (to transfer Chart of accounts and company code data) and the receiving system.
Then execute and the system will start generating the IDOCs. The process might take a while to generate all the IDOCs, so be patient.
To monitor the progress of this you might want to open IDOC monitoring transactions like WE02 / WE05 on both clients (Sender and Receiver) so you can see the number of IDOC being process, sent, or in error.
WE02 in Sender Client

WE02 in Receiver Client

In some cases and under unknown circumstances, the Sender system generates the IDOCs but does not process / sends them right away. For that you can execute BD87 to re-process them and they will get sent out.
In future Posts I will publish other Master Data Objects that can be transferred using ALE.
Great work and explanation Adrian.
Vikram Dua